UNWANTED EXPERIMENT
Complete Walkthrough
Hello everyone and welcome to our walkthrough for “The Unwanted Experiment” an escape room game created by the Dark Dome. The Unwanted Experiment is the first game in the series, and like the games that followed it, the story is set in Hidden Town, which is filled with all kinds of mysteries. In this walkthrough, we will show you how to solve all the puzzles and finish the game.
NOTE: Some puzzles will CHANGE with each playthrough, but the logic behind solving the puzzles will always remain the SAME. For example, in one playthrough a code to open a safe could be 1234, and in another playthrough, the code could be 4321. However, you will always discover the numbers for the code at the same location and by using the same hints.
The story begins with the arrival of the strange scientist, who decided to move into the house on the outskirts of Hidden Town. Shortly after his arrival, villagers started to see strange shapes moving in the darkness, near his cabin. Nobody knew much about the scientist since he kept his distance from the villagers. They only knew that he had set up his laboratory in the basement of his house.

Erik Dorian, a villager from the Hidden Town wanted to see with his own eyes if the rumors of these strange creatures are true. When he discovered the entrance to the underground laboratory, he was sure that he was close to unveiling the mystery surrounding the strange scientist. However, in his excitement, he didn’t notice that the strange scientist sneaked up on him. Before Erik could react, the scientist knocked him out. When he woke up, Erik found himself inside tied up to a chair, inside the underground laboratory…

First, tap on Erik to wake him up, then tap on the rope several times. After a few tries, Erik will manage to free himself. Now we have to find a way to escape from the lab.

If we tap on the biometric lock, we will see that Erik’s fingerprints won’t work. This panel probably unlocks the exit from the lab. Let’s see what else we can find in this room.

Tap on the yellow book, on the left side of the top shelf. Tap on the arrow on the bottom right corner of the book to open it. We can see that the flower inside the book should be cut out with scissors. However, we don’t have scissors, so let’s close the book and return it back on the shelf.

Tap on the box on the bottom shelf to open it. Then, tap on the CD inside it to pick it up.

Ok, we can also see that there is some kind of wall safe on the middle shelf, but we don’t have the combination to open it. There’s also a cabinet above the sink, but we don’t have the key to unlock it. Just take note of these two objects. Now, let’s tap on the arrow on the right to go to the next room.

Tap on the dart in the upper left corner of the screen to take a closer look, tap again to pick it up.

Tap on the shelf on the left to take a closer look. Tap on the brush, on the right side of the top shelf to pick it up.

Also inside this room, there are 5 more important objects. A red book on the lower shelf, two locked drawers below it, a locked box on the table on the left, and some kind of lock on the wall. For now, just take note of these objects, and let’s continue to the next room on the right.

There’s nothing we can do inside this room. For now, just take note of the important objects inside it. A closet blocked by some kind of slime, a box that should be unlocked with some kind of combination of symbols, a locked lid for turning lights on/off, and a locked jail door. So, let’s proceed to the next room on the right.

In this room, you will see two tables. Tap on the drawer on the table on the right to open it.

Inside the drawer, you will find a flashlight and a transparent sheet. Tap on these two items to pick them up.

There are several important objects inside this room. Two rows of buttons on the wall on the left, and below them there’s a fuse box, but one of the fuses is missing. Also, the drawer of the table on the left is locked and requires some kind of keycard. Above this table, there are several flasks for some kind of chemistry experiment. There’s also a microscope on the table on the right. Most importantly, take note of the two boards in the upper right corner. Both of them have four images, two on the top and two on the bottom. We will soon come back to these images. Ok, that’s it for this room. Tap on the arrow on the right to go to the next room.

Ok, we’re back in the first room. Tap on the arrow on the right to go to the next room.

Here, we can finally start solving our first puzzle. Tap on the red book on the lower shelf on the right. Then, tap on the arrow on the lower right corner of the book to open it.

Now, tap on the translucent sheet in the inventory to select it and tap on the grab option. Then, tap on the page to place the translucent sheet.

You will notice that the four squares on both of the pages are arranged in a similar manner to the images that we saw on the two boards in the last room. Also, you will notice that after we placed the translucent sheet, we can see that there is a single red line inside the upper left square and that there are three red lines inside the upper right square. The number of lines indicates the chronological order of the squares (actually the order of symbols on the images, but we’ll get to that). So, let’s memorize or write down this information.
Right side / Upper left square = One Red Line (First)
Right side / Upper right square = Three Red Lines (Third)

Ok, now let’s take a look at the four squares on the left. Tap on the arrow near the lower right corner of the book to transfer the translucent sheet to the other page.

Here, we can see that there are two red lines inside the upper right square and that there are four red lines inside the upper left square. Ok, let’s memorize or write down this information.
Left side / Upper right square = Two Red Lines (Second)
Left side / Upper left square = Four Red Lines (Fourth)

Ok, now let’s go back to the room with two boards inside of it, and each of them has four images. That would be the second room on the right.

So, we know that the first image that we’re looking for is on the right board, and it’s one in the upper left part (because this image had only one red line). Tap on this image to take a closer look at it.

We can see that there’s some kind of symbol in the fourth book (right to left). The symbol looks like a circle with a “tail” and an arrow. Memorize/Write down this symbol because it is the first one that we will need to open the box inside the room with the jail door.

The second image is in the upper right square on the board on the left so let’s take a closer look at it. Here we can see a symbol resembling a Cyrillic letter “Ђ” on the trophy. Memorize/Write it down because it’s the second symbol.

The third image is in the upper right square on the board on the right so let’s take a closer look at it. Here we can see a symbol similar to a crescent moon. Memorize/Write it down because it’s the third symbol.

The fourth image is in the upper left square on the board on the left so let’s take a closer look at it. Here we can see a symbol that resembles a triangle that is intersected by the line. Memorize/Write it down because it’s the fourth symbol.

Ok, let’s now go back to the room with the jail. It’s the first one on the left, so tap on the left arrow.

On the wooden table, you will see a locked box. Tap on it to take a closer look. Here we can see that we will need a combination of four symbols to unlock the box. We already discovered the combination to unlock the box, so let’s use it. Tap on the symbols to cycle through them.
First Symbol = a circle with a “tail” and an arrow
Second Symbol = a cyrillic letter “Ђ”
Third Symbol = a crescent moon
Fourth Symbol = a triangle intersected by the line
NOTE: The box will open as soon as you enter the correct symbols.

We can see that there is a “fuse” and a “yellow key” inside the box. Tap on these items to pick them up.

Ok, let’s now go back to the room in which we saw a missing fuse. It’s the first one on the right.

Tap on the fuse box to take a closer look. Then, select the “Fuse” from the inventory and tap on the empty space on the right.

If we push the buttons on the board above the fuse we can see that the red light will start to blink, because we restored the power when we inserted the fuse. However, we don’t know the combination for this puzzle, yet. So, let’s go back to the room with the “Red Book” and look for clues. This room is the second one on the left.

Tap on the “Red Book” to open it and tap on the arrow in the lower right corner to flip through the pages. You will see a hint that involves creating some kind of liquid out of an apple, a feather, and a flower. Just take note of it, because we will need this hint later. For now, tap once more on the arrow in the lower right corner to switch to the next page.

On this page, we can see information about a test subject that the scientist turned into a monster. Tap on the picture of the man, and you will discover a hint on the back of the picture.

Here we can see the order in which the buttons on the board above the fuse should be pressed (black squares represent the position of the correct buttons). So, we need to press (from right to left):
First: Upper button
Second: Upper button
Third: Lower button
Fourth: Upper button
NOTE: As I mentioned at the beginning of this walkthrough, the order of buttons might be different in your playthrough, but you will always find a hint here, behind the image of the test subject.

Ok, let’s now go back to the room with a fuse box. It’s the second one on the right.

We should now press the buttons in the same order as on the note that we discovered inside the red book. Our task is to count and memorize/write down how many times will each of the lights blink. So, let’s do that.
First button = Upper one = Blinked 3 times
Second button = Upper one = Blinked 4 times
Third button = Lower one = Blinked 6 times
Fourth button = Upper one = Blinked once
We can use this information to open the lid on the door of the jail cell.
NOTE: As with the majority of the puzzles in this game, the order of buttons and the number of times that lights blinked could be different in your game.

So, let’s go back to the room with the jail cell. It’s the first one on the left.

Tap on the padlock on the door to the jail cell to take a closer look at it. We can see that the combination on the padlock is represented by the roman numerals. To open the padlock, we should insert the number that corresponds to how many times the light blinked in the previous puzzle. So, let’s do that.
The First Number = 3 (because the first red light blinked 3 times)
The Second Number = 4
The Third Number = 6
The Fourth Number = 1
NOTE: The second you enter the correct password, the padlock will drop to the ground.

After unlocking the padlock, tap on the lid to open it. Inside the cell, you will see a half-mutated human, chained to a wall. Tap on him to start the interaction.

The man inside the cell will say that his name is Alex Lauren. He will explain that he was working with Dr. Freyer (the strange scientist), but when Alex discovered that Dr. Freyer was conducting experiments with the genetic mutations, they got into a heated argument. Alex didn’t approve of this research because he considered it to be dangerous and decided to report Dr. Freyer to the authorities. However, as soon as Alex turns to leave, Dr. Freyer grabbed him from behind, injected him with a mutant virus, and locked him up in a cell. So, the former assistant, Alex, became one of the test subjects of the mad scientist. Alex also told Erik (our character) that his mutation is in the advanced stage and he needs the antidote quickly. Apparently, Dr. Freyer didn’t bother to change the locking mechanism of the entrance to his laboratory, and Alex’s fingerprints can still open the door. So, if we can find the antidote, Alex will become human again and we can escape from the laboratory. Our character wanted to know how he can find the antidote, and Alex replied that he knows the password that should help us get to the antidote. However, before Alex could tell us the password, his mutation was complete. He turned into some kind of a reptilian monster, and lost the ability to speak…


Well, Alex lost his ability to speak, but he might still be able to help us. Tap on mutated Alex.

Alex lost his ability to speak, but he was able to draw the symbols of the password in the mid-air with his finger. As soon as you tap on Alex, pay attention to the symbols that he’s trying to show you.
The First Symbol that he draws looks like a Circle.
The Second Symbol that he draws looks like a Square.
The Third Symbol that he draws looks like a Triangle.
The Fourth Symbol that he draws looks like a Serpent.
NOTE: As far as I’m aware, Alex will always draw the same four symbols. However, their order can be DIFFERENT in your game.

Ok, this password can be used to unlock the red box in the first room on the left, so let’s go there.

Tap on the red box on the table to take a closer look. You will see that you’ll need a combination of four symbols to unlock this box. Tap on the fields of the box to cycle through the symbols until the symbols of the password match with the symbols that Alex has shown us. So,
First Symbol = Circle
Second Symbol = Square
Third Symbol = Triangle
Fourth Symbol = Serpent
NOTE: As soon as you enter the correct symbols, the box will open.

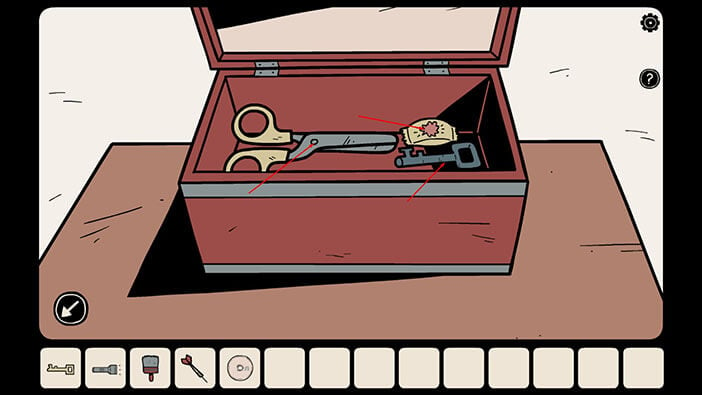
Inside the box, you will see three items, scissors, bubble gum, and a blue key. Tap on these three items to pick them up.
Before we do anything else, let’s use the “Yellow Key” that we found inside the box that we unlocked by solving our first puzzle (the one with the red book, images on the board, and strange symbols). The “Yellow Key” unlocks the cabinet above the sink in the first room on the left so let’s go there.

Select the “Yellow Key” from the inventory and tap on the cabinet above the sink to unlock it.

Tap to open both cabinet doors. Inside you’ll see a thread, an empty beaker, and an eye that is hanging from the top of the cabinet. Tap on the thread and an empty beaker to pick them up.

You might remember that we saw a book with the drawing of a flower that we suppose to cut with scissors. Well, since that book is inside this room, and we now have scissors, we might as well do that now. Tap on the book on the top shelf to take a closer look at it, and tap again to open it.

Select the “Scissors” from the inventory and tap on the flower to cut it out. A “Paper Flower” will be added to your inventory.

Also, pay attention to the 3×3 grid that is used as a password for a safe on the middle shelf, because the puzzle that unlocks it comes next. Ok, now let’s go to the room with the jail cell. It’s the second one on the right.

Select the “Blue Key” from the inventory and tap on the keyhole on the lid to the left of the jail door. After unlocking the lid, tap once more to open it.

Pull the lever by tapping on it. This will turn on the light inside the jail cell.

Now, tap on the bars on the window of the jail cell to take a look inside.

With the lights turned on, we can now see that there are four squares drawn in the right corner of the room. If you look closely, you can probably conclude that the position of the squares on the wall looks like they’ve been arranged inside the 3×3 grid. There are also some lines drawn on each of the squares, and the number of lines represents the chronological order of the squares. So, let’s memorize/write down the chronological order of the squares and their position on the grid.
First = Second field (right to left) in the third row (because it has only a single line)
Second = Second field in the first row
Third = Third field in the second row
Fourth = First field in the second row
NOTE: The chronological order and position of the squares might be different in your game.

Ok, let’s now go back to the room with the box that’s locked by the password with a 3×3 grid. It’s the second one on the left.

Tap on the locked box on the middle shelf to take a closer look.
Now, let’s press the fields on the grid in the same order as we saw on the wall inside the jail cell. So, tap on,
First = Second field (right to left) in the third row
Second = Second field in the first row
Third = Third field in the second row
Fourth = First field in the second row
After you enter the correct code, the light on the safe will turn green. Tap on the safe door to open it.

Inside the safe, you’ll see bread, an apple, and some kind of note with a formula for mixing chemical ingredients. Tap on all three items to pick them up.

Ok, let’s now go back to the room with the jail cell – the second one on the right.

Tap on the barred window on the cell to take a look inside.

We can see that there’s a small bird in the bottom right corner of the room. Select the “Bread” from your inventory and tap next to the bird to throw her the bread and feed it.

After she ate the bread, the bird flew away, but before she left the cell one of her feathers dropped to the ground. If we tap on it, we find out that it is too far away for our character to reach it.

Ok, let’s find a way to reach that feather. First, select the “Bubble Gum” from your inventory and tap on the “Chew” option.

Now, select the “Chewed Gum” from the inventory and tap on the “Thread” to combine these two items. Our character will attach a chewed gum on the end of the thread and we can now use this item to “fish out” the feather from the jail cell.

Select a “Piece of chewed gum on the string” from the inventory and tap on the feather. Our character will throw the thread, the feather will stick to the bubble gum on the end of the thread, and our character will then pull back the thread and the feather. A “Feather” will be added to your inventory.

Ok, let’s now check the “Red Book” again, because in there we will find another hint. The room with the “Red Book” is the first one on the left.

Tap on the red book to open it.

Flip the pages until you see a beaker on the left side, and an apple, a feather, and a flower on the right side. Well, we can conclude by looking at the image that the items on the left are used for creating some kind of chemical solution.

Since we already have all three of the required items, let’s go to the laboratory. It’s the second room on the right.

Tap on the beaker on the table to take a closer look. Now, we can see that three small blenders above the table, and below each one of them is a beaker. Also, every blender is marked with a differently colored square – blue, yellow, and red. We now have to insert the correct ingredients into the blenders, by matching the color of the ingredient with the color of the square on the blender.

First, select a “Flower” from the inventory and tap on the blender marked with a blue square.
Second, select a “Feather” from the inventory and tap on the blender marked with a yellow square.
Finally, select an “Apple” from the inventory and tap on the blender marked with a red square.

Now, select the “Empty Beaker” from the inventory and tap on the table to place it.

Tap on the note with the chemical formula in your inventory (a beaker filled with different colors) to take a closer look. Now, we have to pour in the chemicals that we created in the same order as they are represented on the note – so again we will do matching by colors. Do note that the first chemical that we pour into the beaker will be on the bottom of the beaker. So, we should look at the colors from bottom to top and pour in the chemicals in the following order:
First = Yellow
Second = Blue
Third = Yellow
Fourth = Red
Fifth = Blue
Memorize or write down this information, and let’s proceed with the mixing of the chemicals.
NOTE: In your game, the order of colors might be different, so take a look at the note in your game, and follow the order of the colors.

Ok, now let’s tap on the chemicals in the same order as we saw on the note. So, Yellow, Blue, Yellow, Red, Blue.

After you successfully mix up the chemicals, the “Beaker with the antidote” will be added to your inventory. Ok, now let’s cure Alex, a mutated prisoner. He is in the first room on the left.

Before we go near the door of the jail cell, let’s soak the “Dart” into the antidote. Select the “Dart” from the inventory and tap on the “Antidote”. After combining these two items a “Dart with the antidote” will be added to the inventory.

Ok, now tap on the barred window on the jail cell to take a look inside. We can see that the mutation is complete, and poor Alex has turned into some kind of a reptilian monster. Let’s cure him. Select a “Dart with the antidote” from the inventory and tap on Alex to hit with the dart.

After we hit Alex with the dart soaked in antidote, the effects of the mutation quickly subsided and he returned back to normal. Naturally, Alex was very grateful to Erik for his help, and now two of them decided to work together on finding a way to escape from the laboratory.

From now on we will have two characters, Alex and Erik, and we can switch between them by tapping on their images in the inventory. For now, let’s play as Alex and see what he can find on his side of the cell door.

First, let’s tap on the dart to pick it up because we might need it later.

Take note of the air duct in the lower-left corner, before we’ll get back to it, later. For now, let’s check out the room on the right.

In here, we can see a cabinet and the CD player on top of it. Let’s see what we can find inside the cabinet. Tap on both cabinet doors to open them.

We can see a toy robot inside the compartment on our left. Tap on the robot to take a closer look at it, and then tap on the arrow to turn it around. Now, tap on the back of the robot to remove the lid, and tap once more to take out the battery. A “Small Battery” will be added to your inventory.

If we tap on the bowl in the right compartment, we will discover that it is filled with sugar cubes, but our character can’t take them, because they are extremely small. So, let’s check the CD player.

Tap on the CD player to take a closer look at it, then tap on the arrow in the upper right corner to take a look at the back of the CD player. We can see that the battery is missing, so select the “Small Battery” from your inventory and tap on the empty space to insert it.

Ok, now take a look at the front of the CD player and tap on the lid marked with a note. We can see that there’s no CD inside. So, select a “Compact Disc” from your inventory and tap to put it inside the CD player.

Ok, now let’s change to track number two and press the play button. We can hear the sound of a frog croak. We will need to listen to this CD a bit later, for now, let’s see what else we can find.

Take note of the lock on the wall, before we will come back to it a bit later down the road. For now, let’s proceed to the room on the right.

Here we can see that somebody was drawing hash marks on the wall. Let’s now switch the character (to Erik), and check out the “Red Book” for hints.

The “Red Book” is in the first room on the left.

Tap on the “Red Book” to open it, and then flip the pages until you see a drawing of the flashlight on the left side. By looking at this drawing, we can conclude that we should discover something if we turn off the lights, and use the flashlight to look at the wall with hash marks. As you can see, on the top picture the light is turned on, but on the bottom picture the light is off, but the flashlight is turned on. So, let’s do this and see what happens.

Go back to the room with the jail cell. It’s the first one on the right.

Tap on the lever to take a closer look at it, then tap once more to pull it down and turn off the power inside the jail.

Now, let’s switch to Alex.

Select the “Flashlight” from the inventory and tap on the wall with hash marks. First, we can see a drawing of a musical note, which means that the hash marks have something to do with sound or music (this is a hint that connects the hash marks with the CD player). Besides that, we can see that some hash marks are marked with a blue circle that is drawn around them. Starting from the top, let’s count the number that the hash mark represents because we will need this information, very soon.
First Hash Mark = 7
Second Hash Mark = 2
Third Hash Mark = 5
Fourth Hash Mark = 9
Memorize or write down this information.
NOTE: The numbers may be different in your playthrough, but you can solve this puzzle by using the same logic.

The numbers that we discovered by looking at the hash marks on the wall represent the number of tracks that we should listen to on the CD player. But, before we do that, let’s switch to Erik and turn on the lights.

As before, tap on the lever to pull it up and turn on the lights.

Now, let’s switch back to Alex.

Ok, let’s go back to the room with the CD player. It’s the first one on the left.

Ok, now tap on the CD player to take a closer look at it. Our task is to use the numbers that we discovered by looking at the hash marks on the wall. We will use them to play and listen to the tracks which are labeled with the matching numbers. So,
First, we will listen to track number 7. We can hear “Laughter”.
Second, we will listen to track number 2. We can hear “Frog Croak”.
Third, we will listen to track number 5. We can hear “Bell Ringing”.
Fourth, we will listen to track number 9. We can hear “Guitar sound”.
Write down/Memorize this information because we will need it to solve the next puzzle.
NOTE: As far as I’m aware, you will always get the same sounds, but in your game, they might be in a different order. For example, “Laughter” could be the fourth sound instead of the first one.

Ok, now let’s switch our character to Erik.

Let’s go to the room with the “Red Book”. It’s the first one on the left.

Here, you will see a bottom drawer (below the “Red Book”) that is locked with some kind of password consisting of four symbols. Right now, all four symbols of the password are bells. Tap on this mechanism to take a closer look at it.

Tap on the four fields until you see a symbol that matches the sound that we heard on the CD player. So, the symbols should be (looking from right to left):
First = “Laughter”
Second = “Frog Croak”
Third = “Bell Ringing”
Fourth = “Guitar sound”
NOTE: The order of symbols might be different in your game.

As soon as you enter the correct symbols, you will hear the clicking sound that indicates that the drawer is unlocked. Tap on the drawer to open it. Inside the drawer, you will see a bucket. Tap on in to pick it up and the “Paint Thinner” will be added to your inventory.

Ok, now let’s switch to Alex.

Let’s check out the second room on the right.

Here, we can see a briefcase near the barred window. If we tap on the briefcase the monster will appear next to it, preventing us from reaching the briefcase.

More importantly, we can see that there are several paint stains on the wall. We should be able to remove the paint from the wall by using the paint thinner that we just found by unlocking the drawer with the “sound” symbols. So, select a “Brush” from the inventory and tap on the “Paint Thinner” to soak it in. A “Brush soaked in paint thinner” will be added to the inventory.

Ok, now select the “Brush soaked in paint thinner” from the inventory and tap on the paint on the wall to remove it.

After we removed the paint from the wall, we can see that there were six arrows hidden beneath the paint. Let’s write down/memorize where these arrows are pointing at. Starting from left to right, we have:
First = Left
Second = Down
Third = Right
Fourth = Right
Fifth = Down
Sixth = Up
NOTE: The direction of the arrows might be different in your game. However, you will still discover them the same way – by using the paint thinner to remove the paint from the wall.

Before we move on, tap on the pillow to move it aside. Below it, you will find a small coin. Tap on it to pick it up.

Ok, now let’s switch to Erik.

In the room in which we saw a previous puzzle with the “sound” symbols, we can also see that there is some kind of lock with four arrows. Tap on this mechanism to take a closer look at it.

Ok, we already know in which order the arrows on this lock should be pressed (because we removed the paint from the wall in jail and saw the arrows hidden beneath it). So, let’s start:
First = Left
Second = Down
Third = Right
Fourth = Right
Fifth = Down
Sixth = Up
After pressing the six arrows, tap on the OK button to confirm.

After unlocking this mechanism, we can see another puzzle. The central (smallest) circle can’t be rotated. Our task is to rotate the other three circles until they’re lined up and forming a clear image. Since the first (central) circle can’ be rotated, let’s start by lining up the lines on the second circle with the central circle.

Next, let’s line up the second and the third circle.

Finally, let’s line up the outer circle with the third circle. As soon as you assemble the correct image, the small compartment below this puzzle will open. Inside this compartment, you will see a paper bird. Tap on it to pick it up and an “Origami Bird” will be added to your inventory.

Ok, now let’s switch to Alex.

You will notice that there’s a birdcage in the room with arrows on the wall. Select the “Origami Bird” from the inventory and tap on the birdcage to put it inside.

The origami bird will fly around the cage (don’t ask how) and will bring some kind of a ticket in its beak. Tap on the ticket to pick it up, and a “Yellow microscope slide” will be added to the inventory.

Ok, now let’s switch to Erik and take a look at his microscope slide.

Go to the room with the microscope and other laboratory equipment. It’s the second one on the right.

Tap on the microscope to take a closer look at it. Then, select the “Yellow microscope slide” from the inventory and tap on the microscope to place it on the examination panel.

Tap on the microscope to examine the slide.

Use the vertical slider on the right to adjust the sharpness of the image. Once we have a clear view of the slide, we will be able to see a small chest, and six arrows in the lower right corner of the slide. These arrows represent the combination for solving the next puzzle, which is very similar to the previous one. Ok, so let’s memorize/write down the direction in which arrows are pointing, starting from right to left.
First: Up and Left
Second: Down and Right
Third: Up and Right
Fourth: Up and Right
Fifth: Down and Left
Sixth: Down and Right 
Ok, now let’s switch to Alex and use this information.

Go to the second room to the right – the one with the CD player. There, you’ll see a locking device on the wall, with four arrows pointing Up and Left, Up and Right, Down and Left, and Down and Right.

Tap on the device to take a closer look. Now let’s enter the code that we discovered by looking at the “Yellow microscope slide” under the microscope. So, let’s tap on the arrows that are pointing:
First: Up and Left
Second: Down and Right
Third: Up and Right
Fourth: Up and Right
Fifth: Down and Left
Sixth: Down and Right
Once you’re done, tap on the “OK” button.

After we entered the correct code, the still shutter will retract, revealing yet another puzzle. Our goal here is to slide different pieces and assemble the same image as the one on the right.

For simplicity’s sake, let’s mark the field on this puzzle with numbers, before we start solving it. Let’ say that, starting from right to left in the top row, we have fields 1, 2, and 3. In the middle row 4, 5, and 6, and finally 7, 8, and 9 in the bottom row.

Ok, let’s begin. First Step:
Tap on field number 5
Tap on field number 2
Tap on field number 1
After completing the first step, your image should be like the image below.

Second Step:
Tap on field number 4
Tap on field number 5
Tap on field number 6
After completing the second step, your image should be like the image below.

Third Step:
Tap on field number 9
Tap on field number 8
Tap on field number 7
After completing the third step, your image should be like the image below.

Fourth Step:
Tap on field number 4
Tap on field number 5
Tap on field number 6
After completing the fourth step, your image should be like the image below.

Fifth and Final Step:
Tap on field number 9
Tap on field number 8
Tap on field number 7
And that’s it, we managed to solve this puzzle.

As soon as you solve the puzzle above, the small compartment below the image of the fish will open up. Tap on the item inside the compartment and an “Origami Fish” will be added to your inventory.

Ok, now let’s go to the first room on the right (the one with hash marks) because we saw that there’s a fishbowl in this room.

Once you get there, select the “Origami fish” from the inventory and tap on the fishbowl to put it in.

The Origami Fish will swim into the small castle (again, don’t ask how), and will bring up a small item to the surface. Tap on the item to pick it up and a “Pipe Valve” will be added to your inventory.

Ok, now let’s switch to Erik, and use the newfound item.

Let’s head to the room with the sink. It’s the first one on the right.

Take a look at the tile below and to the right of the sink. You will notice that this tile has a crack on it, and it is also marked with an “X”. Tap on this tile to take a closer look, and tap once more to remove it, revealing a water pipe behind it.

Now, select the “Pipe Valve” from the inventory and tap on the pipe valve. Tap once more to turn it and release the water.

As soon as we release the water, we will see a cutscene, showing a water grate, and below it the garbage being taken away by the water. Once the garbage is cleared, we can see that there was a numerical code hidden below it.


Ok, let’s now switch to Alex and check out this code.

The water grate that we saw in the cutscene is located in the room with the CD player. It’s the first one on the left.

Tap on the water grate to take a closer look. We can now clearly see the numbers that were hidden below the garbage. Write down/memorize these numbers (if you missed them during the cutscene). Our code is: “9634”
NOTE: You might get a different code in your playthrough, but you will discover it in the same way as I’ve shown here.

Ok, now let’s go to the room with the origami bird, and use this code. This room is the second one on the left.

Tap on a suitcase to take a closer look at it. This time, the monster won’t appear.

Enter the code that you discovered by releasing the water and clearing out the garbage. In our playthrough, the code is “9634”.

As soon as you enter the correct code, you will hear a clicking sound, and the suitcase will open. Tap on both items inside it to pick them up, and a “Scalpel” and a “Pink Key” will be added to your inventory.

Ok, now let’s switch to Erik and use this key.

We should go to the room with the “Red Book”, and it’s the first one on the right.

Here, tap on the drawer below the “Red Book” to take a closer look. Select the “Pink Key” from the inventory and tap on the keyhole to unlock the drawer.

Tap on the drawer to open it, and inside you will find an “Empty Beaker” and “Note with the chemical formula”. Tap on both items to pick them up.

Now, let’s tap on the chemical formula to take a closer look at it. You will notice the drawing of something that is very similar to the slime that is blocking the closet. So, the formula below it is probably used to create some solution that can remove the slime.

Ok, let’s go to the laboratory and prepare this solution – the second room on the right.

Tap on the laboratory equipment to take a closer look at it.

Select the “Empty Beaker” from the inventory and tap on the table to place it.

Ok, now let’s look at the formula again, and write down/memorize the order of colors, starting from bottom to top, just like in the previous example.
First = Red
Second = Yellow
Third = Red
Fourth = Blue
Fifth = Yellow

Ok, now let’s make this solution. A “Purple Strange Solution” will be added to your inventory.

We already discovered that this solution can remove the slime from the closet that is located in the room with a jail cell. So, let’s go there – this room is the first one on the left.

Select the “Purple Strange Solution” from the inventory and tap on the purple slime that is blocking the closet to remove it.

After that, tap on the closet doors to open them, and tap once more to take a closer look. Inside the closet, you will find two items, a “Magnetic Card” and an “Empty Jar”. Tap on these items to pick them up.

We can see that there’s an arrow drawn on the magnetic card. Earlier we saw a slot for the magnetic card on the drawer in the laboratory (the table with laboratory equipment). A similar arrow was also drawn above the slot on the drawer, so let’s go back to the lab. It’s the first room on the right.

Tap on the aforementioned drawer to take a closer look. Select the “Magnetic Card” from the inventory and tap on the slot to insert the card and unlock the drawer.

After inserting the card, you will hear a clicking sound indicating that the drawer is unlocked, so tap on it to open it. Tap on the item inside the drawer to pick it up, and a “Pair of tweezers” will be added to your inventory.

Ok, now let’s go back to the room with a sink. It’s the first one on the right.

Here, you’ll see an arrow in front of the ladder, and near the ceiling. Tap on the arrow to take a look at the ceiling.

While looking at the ceiling, you will see a fly. Select the “Empty Jar” from the inventory and tap on the fly to catch it. A “Jar with a fly inside” will be added to your inventory.

Ok, now let’s switch to Alex.

First, let’s go back to the room with the CD player – it’s the second one on the right.

Earlier, we saw in this room tiny sugar cubes, that were too small for our character to grab with his fingers. But, now we have tweezers, so we should be able to take a diminutive sugar cube. So, tap on the bowl with sugar cubes to take a closer look. Select, the “Pair of tweezers” from the inventory and tap on the bowl with sugar cubes. Our character will manage to take out one of the small sugar cubes and a “Pair of tweezers holding a tiny sugar cube” will be added to your inventory.

Ok, now let’s go to the first room on the left.

Here, you will see some kind of ventilation hatch, tap on it to take a closer look. We can’t interact with a hatch because it’s screwed to the wall. So, let’s select the “Coin” (that we found below a pillow) from the inventory and use it as an improvised screwdriver to remove the screws and release the hatch.

After removing the hatch, we can now see a spider web and a spider. It seems that there’s some kind of a small note below the spider, but our character can’t grab it until we find a way to get rid of the spider.

So, let’s release the fly from the jar and try to bait the spider away from the note. Select the “Jar with a fly inside” and tap on the ground to place it. After that, tap on the lid to release the fly.

Unfortunately, we discovered that the fly doesn’t want to fly into the web. Let’s try to bait the fly with the sugar cube. Select the “Pair of tweezers holding a tiny sugar cube” from the inventory and tap on the upper left corner of the spider web to place the sugar cube.

The fly will take the bait and will fly land on the sugar cube, getting caught in the spider web. Feeling the vibrations in his net, the spider will rush toward the fly, enabling us to take the small not that was hidden below it. Tap on the small note to take it, and the “Red Microscope Slide” will be added to your inventory.

Ok, let’s switch to Erik.

Let’s go back to the laboratory and take a look at this slide under the microscope. The laboratory is the first room on the left.

Tap on the microscope to take a closer look at it. We left our previous slide here, so let’s tap on it to pick it up.

Now, select the “Red Microscope Slide” from the inventory and tap on the microscope to place it on the examination panel.

Tap on the microscope to examine that slide.

As before, use the vertical slider on the right to adjust the sharpness of the image. After adjusting the view, select the “Scalpel” from the inventory and tap on the “bug” to cut it open.

After cutting open the bug, you will discover a key inside of it, but it’s so small that Erik can’t take it with his fingers. So, select the “Pair of Tweezers” from the inventory and tap on the small key to pull it out. A “Pair of Tweezers with a tiny key” will be added to your inventory.

Ok, now let’s pick up the slide.

You probably remember that there was a tiny chest on the other slide, so let’s try to open it with this miniature key. Select the “Yellow microscope slide” from the inventory and tap to place it under the microscope.

Tap on the microscope to examine the slide.

Just like before, use the slider on the right to adjust the sharpness. After that, select the “Pair of Tweezers with a tiny key” and tap on the keyhole on this diminutive chest to unlock it.

You will see some kind of seed inside the chest. With the “Pair of Tweezers” selected, tap on it to pick it up, and a “Pair of Tweezers with a tiny seed” will be added to your inventory.

Now, let’s go back to the room with a sink. It’s the first one on the right.

Tap on the sink to take a closer look at it.

Tap on the sinkhole to look inside, and you will see a key, stuck inside the pipe.

So, select the “Pair of Tweezers with a tiny seed” from the inventory and tap on the sinkhole to throw in the seed.

Now, tap on the water faucet to, well, turn on the water.

After we soaked it in water, the tiny seed suddenly grew like a magic bean and burst through the sink. So, tap on the key to pick it up, and a “Red Key” will be added to the inventory.

Ok, now let’s unlock the cell door, and let Alex out. The room with the jail cell is the second one on the left.

Select the “Red Key” from the inventory and tap on the keyhole to unlock the cell.

Finally, Erik has managed to free Alex. You probably remember from the start of the game, that Alex’s fingerprints can unlock the exit from the laboratory, so now we can finally escape.

Let’s switch to Alex because his fingerprints can open the door.

The room with a biometric lock is the second one on the left.

Ok, before we proceed outside, I would like to point out that there are TWO endings in this game, a Good one, and a Bad One. We will first show you the bad ending.

BAD ENDING
While playing as Alex, tap on the biometric lock and Alex’s fingerprints will unlock the hatch that is the only exit from the lab.

Thrilled, Alex goes first up the ladder. Erik follows behind him, but as soon as he climbed up the ladder, our character saw that the Strange Scientist was waiting for them, and he already knocked Alex unconscious with a metal pipe. The Strange Scientist threatens terrified Erik, saying that he can’t allow him to escape, not after Erik discovered all of his secrets about genetic mutations.

With that, the Strange Scientist drinks the mutagen and he quickly turns into some kind of a multi-eyed red monster. Erik is terrified because he knows that the monster is much stronger than him.

In the next scene, we can see that Strange Scientist is back in his human form. Poor Alex is chained to the wall, once more and the Scientist already transformed him into the reptilian monster. The Strange Scientist now prepares some weird, purple-colored mutagen, that he intends to inject into Erik… And that’s the end of the story.


GOOD ENDING
To achieve a good ending, we will have to somehow defeat the Strange Scientist. So, let’s hit him with the antidote, once he turns into a red monster. Select the “Dart” from the inventory and tap on the “Antidote” (the beak filled with green liquid). After combining the two items, a “Dart with Antidote” will be added to your inventory, and we are now ready to head outside.

Ok, while playing as Alex, tap on the biometric lock, and Alex’s fingerprints will unlock the hatch that is the only exit from the lab.

Thrilled, Alex goes first up the ladder. Erik follows behind him, but as soon as he climbed up the ladder, our character saw that the Strange Scientist was waiting for them, and he already knocked Alex unconscious with a metal pipe. The Strange Scientist threatens terrified Erik, saying that he can’t allow him to escape, not after Erik discovered all of his secrets about genetic mutations.

With that, the Strange Scientist drinks the mutagen and he quickly turns into some kind of a multi-eyed red monster. Erik is terrified but this time we came prepared, and have a way to defeat this monster.

Quickly select the “Dart with Antidote” and tap on the monster to hit it with the dart before it can overwhelm Erik.

As soon as the dart hits, the Strange Scientist will revert back to his human form, while falling to his knees. A few moments later, he will unconscious… Erik and Alex are finally free!

At the end of the game, we can see a police officer taking a statement from Alex (with the bandage on his head) and Erik. Beside them, the hospital workers are loading the unconscious Strange Scientist into an ambulance. The Hidden Town is finally safe again, and the Strange Scientist will remain behind the bars, in the high-security prison.

Erik and Alex hope that he will stay locked up for life, but in the final scene, we can see an arm of the red monster scratching against the window of a prison cell… Our characters can only hope that the sturdy cell door and the prison guards will be enough to stop the monster from escaping…


Well, that brings us to the end of this adventure. If you’re interested in Escape Room games, check out our guides for the other games of this genre.
Thank you for reading.