Ghost Case part 3
Complete Walkthrough
Hello everyone and welcome to Part 3 of our walkthrough for the “Ghost Case” a room escape game created by the Dark Dome. The Ghost Case is the fourth game in the series and, just like the previous games, the story is set in Hidden Town, which is filled with all kinds of mysteries. In this walkthrough, we will show you how to solve all the puzzles and finish the game. The story of the Ghost Case is a continuation of the story of the second game “The Girl in the Window” so I would strongly suggest you play “The Girl in the Window” before starting this story. I don’t want to reveal too much, but it might be a good idea to also play the third game in the series “Nowhere House” before jumping into the “Ghost Case” because there’s also a connection between these two stories.
NOTE: We ended the second part when the detective Ren found the strange ring inside the crypt. We continue the story (third part) with detective Ren going back to the police station to investigate the ring.
Ok, we should now go back to the police station to investigate the ring. To do that, first, tap on the map in your inventory and then tap on the “Police Station”.

Our character found Frederick Nolsen’s file, and he also remembered a person who should be able to provide some information about the ring. After the cutscene, a new location will be added to your map.

If we read Frederick Nolsen’s file, we will find out that he was charged for murdering three people and sentenced to death by an electric chair. Apparently, Frederick used his victims in some kind of a dark ritual, and, before his execution, he promised that he will come back from death. By the way, this event happened in 1904. – more than a hundred years ago…


Ok, let’s check out the new location and see what we can find out about the ring. First, tap on the map in your inventory, and then tap on the “Store” (the new location).


While traveling to the store, detective Ren starts thinking about this mysterious case. He suspects that through the use of unnatural forces and dark magic, Frederick Nolsen came back to life. As strange as it sounds, this makes perfect sense, because he is then probably responsible for the murders of Dan and Mia. That would explain why the siblings were so paranoid, and why they saw some very strange, unnatural events before they died. Also, they were the ones that opened Frederick’s tomb, and, somehow, unintentionally set him free. 
After some time, we arrived at the store, and we can finally have a chat with Laia about this strange ring.

Before we ask her any questions, let’s take a look at the shelf behind her. Here, we can see another owl. Tap on it to collect it.

Ok, let’s ask Laia the first question “What can you tell me about the ring?”

Well, after examining the ring, Laia confirmed that the ring belonged to the practitioner of the dark Shamalu magic. She also confirmed that this magic could enable someone to come back from the dead.

Tap on the second question “Do you know cases related to Shamalu magic?”

Well, as we already guessed, Frederick Nolsen used Shamalu magic. Besides him, there’s also a cemetery guard who went mad.

After that, the Laia will show us an article about Lenny, the cemetery guard. By reading it, we will discover that Lenny, was admitted to the madhouse, after witnessing some very traumatic event during a night patrol. Five years later Lenny began to draw some strange symbol, which looks exactly the same as the symbol on the strange ring (which we found in Frederick’s crypt). Also, Lenny is repeating some strange phrase over and over again.

Well, the detective thinks that he should follow this lead, and decides to visit the madhouse and interrogate Lenny (the new location will be added to your map).

Before we go to the new location, let’s see what else we can find out from Laia. Tap on the third question “What did the rituals consists of?”

Hmm, this is interesting. It seems that, in order to achieve internal life, the practitioner of the dark magic has to make seven human sacrifices. After the first three sacrifices, the practitioner has to die. We know, that Frederick Nolsen was executed after he committed the triple murder.
After that, somebody has to open his grave in order to release his spirit. That’s exactly what Mia and Dan, unintentionally did.
Lastly, he has to make another four human sacrifices to obtain eternal life, and during this time his spirit will have some control over his body. Well, we know that Frederick already murdered/sacrificed two people, Dan and Mia. Now, he needs only two more sacrifices to complete the ritual…

Ok, let’s tap on the last question “Can a Shamalu ritual be undone?”

Well, this is good news, because now we know that the ritual can be stopped. So, it’s possible to trap Frederick’s spirit inside the doll if we combined it with the inverted symbol on the ring, during the last sacrifice…. This information might come in handy, later.

With that said, Laia will offer us a Shamalu doll. Tap on it to pick it up, because we might need it later to stop the ritual.

Ok, we are done here. Let’s pay Lenny a visit. Tap on the map in your inventory to bring it up, and then tap on the “Mental Hospital”


While driving to the mental hospital, detective Ren concludes that Frederick needs two more victims two complete the ritual (as we already guessed). Well, our character thinks that Frederick will strike soon, and hopes he will be able to find a way to stop him before that.

After some time, detective Ren arrived at the mental hospital and asked for information about Lenny Auris.

Before we start asking questions, let’s first tap on the book to take a closer look. Here, you will find another owl.


Ok, let’s ask the first question “How long has he been in the asylum?”

Well, it seems that Lenny has been admitted into the asylum on the day when Den and Mia opened Frederick Nolsen’s tomb. He probably saw something extremely horrifying (or unnatural) and went insane.

Let’s ask the second question “What is happening to him?”

The nurse confirms our suspicion by saying that they also suspect that Lenny witnessed some traumatic event. It seems that this was so traumatizing that he lost his ability to speak. The nurse also suspects that Lenny is trying to explain what happened to him by drawings. However, they weren’t able to figure out the meaning of his drawings, at least not yet.

Let’s ask the third question “Do you think he’s trying to say something?”

Well, the nurse confirms our theory. I guess our next task will be deciphering Lenny’s drawings.

Let’s ask the last question “Can I see him and talk to him?”

Well, the nurse reminded detective Ren that Lenny just keeps repeating one phrase over and over again. However, she will let us see him. So, tap on the “Sure, let’s go” and the nurse will take you to Lenny’s room.

Before we start analyzing the drawings on the wall, let’s first tap on the piece of paper located below the mattress. Here, we will find another owl.


Ok, we can see multiple drawings of the strange symbol (the same symbol is on the ring that we found in Frederick Nolsen’s tomb). Also, it seems that Lenny tried to explain what happened to him by drawing a series of pictures. Let’s take a look at them, starting from left to right.
By looking at the pictures, we can conclude that someone entered the tomb and opened Frederick’s tomb. That brought him back to life. After that, we can see Frederick’s shadow looming over some girl (probably Mia). The next picture could be either a door or a mirror. Finally, we can see Frederick’s dark shadow looming over four figures. Well, four friends went to the graveyard that night, Dan, Mia, Lian, and Anna. If Lenny is correct, then Frederick is also stalking Lian and Anna.
NOTE: These images are just there to explain the story, and don’t provide the clues for the upcoming puzzles.

Let’s now take a look at the other four drawings, because they provide a clue for the next puzzle. Here, we should take a look at the drawings from left to right and write down the shapes on the drawing and the position of the dots.
NOTE: The position of the dots on the drawings is randomized each time you start a new game.

Finally, let’s tap on Lenny to start the conversation.

Lenny will tell us a riddle that will help us to complete one of the following puzzles, so write it down.
“In the end, there will be fire…”
“But first you will see the sea.”
“The moon will light up first…”
“And then the hurricane will come.”
NOTE: You might get a different riddle because they are randomized every time your start a new game. We will provide solutions for several other possible riddles when we get to the puzzle.

Now, we should go back to the graveyard. So, tap on the map in your inventory to bring it up and then tap on the “Graveyard”.


On the way to the graveyard, detective Ren will receive a phone call from the police station. Somebody broke into Lian’s and Anna’s house, and they are now missing. Well, we know that Frederick needs two more victims in order to complete the ritual, and we also saw in Lenny’s room that the dark shadow of this guy looms over all four friends that went into the graveyard that fateful night, 20 years ago. So, everything adds up. Frederick kidnapped Liam and Anna and intends to sacrifice and complete the ritual. Our character came to the same conclusion and he is determined to stop him. Honestly, I don’t understand why Frederick had to wait so long to go after Liam and Anna because he murdered Dan and Mia twenty years ago. Maybe the ritual couldn’t be completed unless a certain amount of time has passed (from the moment of his death)?


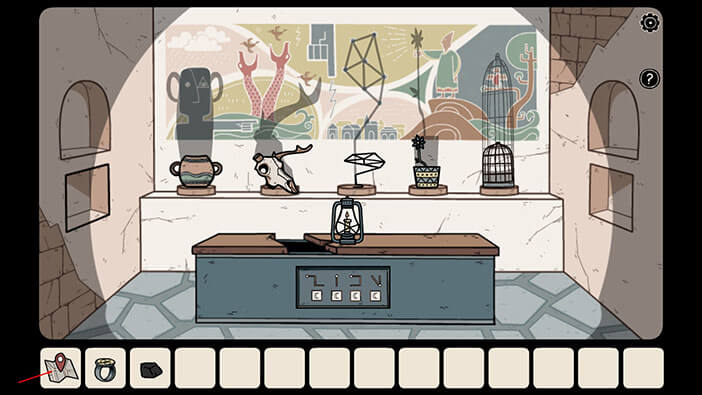
After some time, detective Ren reached the tomb. On the coffin in front of us, we can see the same symbols like the ones that we saw on the wall inside Lenny’s room. Let’s take a closer look.

We can see that all the dots are at the starting positions. Now, we should take a look at our notes (with the drawing from Lenny’s room) and place the dots in the correct (matching) position by tapping on them.

Well, we should now take a look at the second part of the puzzle. Here, we have four symbols. In order to find the right combination of symbols, we will have to decipher Lenny’s riddle, so let’s take another look at it.
“In the end, there will be fire…” (Fire is that last, fourth symbol)
“But first you will see the sea.” (Sea should come before the fire, so the sea is the third symbol)
“The moon will light up first…” (Moon is the first symbol)
“And then the hurricane will come.” (Hurricane comes after the moon, so hurricane is the second symbol)
So, looking from left to right, we have Moon, Hurricane, Sea, and Fire. Tap to browse through the symbols and enter this combination.

Before we continue, here are solutions for some other puzzles, as promised.
“First the sun came out…” (Sun is the first symbol)
“The snail arrived last.” (Snail is the last, fourth symbol)
“The second is the one that follows after the third” (When browsing through the symbols, you will see that fire comes after the hurricane. So, since the third symbol is the hurricane, the second symbol is fire)
“One, two, three, the hurricane will take us” (The hurricane is the third symbol)
So, looking from left to right, we have Sun, Fire, Hurricane, and Snail.
Another example
“The first is the one that follows after the second” (First find the second symbol. After we found out that the moon is the second symbol, we can take a look at this sentence. When browsing through the symbols, you will see that Heart comes after the moon. So, since Moon is the second symbol, the first symbol is the Heart)
“At the end, sun always comes out.” (Sun is the last, fourth symbol)
“One, two, three… one single eye looks at you…” (Eye is the third symbol (one, two, three))
“But before of that, he will look at the moon.” (Before that he will look at the moon, which means that the moon should come before the eye. So, Moon is the second symbol)
So, looking from left to right, we have Heart, Moon, Eye, and Sun.
After entering the correct symbols and placing the dots in the correct position, the coffin will slide to the side, revealing a secret passage that was hidden beneath it. Tap on the stairs to go down.
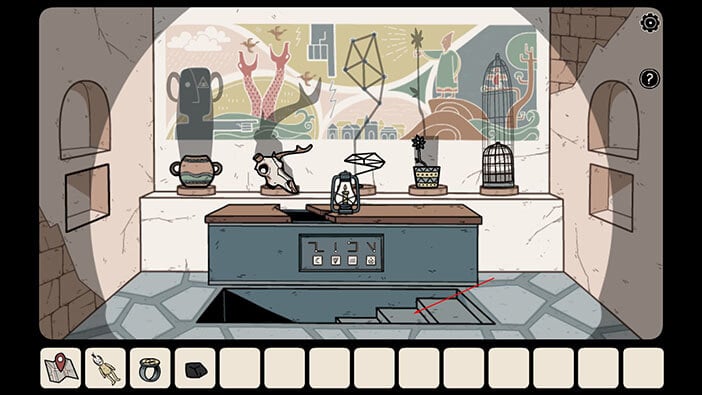
There are several objects inside this room and they will be important, later on. For now, just take note of them and tap on the arrow on the left to proceed into the next room.

Just like the first room, there are several objects here and they will be important, later on. For now, just take note of them and tap on the arrow on the left to proceed into the next room.

In this room, we have a vase with the drawing of a snake, and a locked box. Just take note of these objects and tap on the hole in the wall to proceed into the next room.

Nothing to do here, for now, just take note of the drawing on the wall, and the bowl on your left. After that, tap on the arrow on your to proceed into the next room.

We can see that there are four stone pillars in front of us, and each has a different height. Below them, there are four stone statues of animals. We have a wolf, an elephant, a penguin, and a bull. We should now place the statues on the pillars, and arrange them by weight. The heaviest animal should be placed on the tallest pillar, etc.
The elephant is the heaviest animal so it should be placed on the fourth (highest) pillar.
The bull is the second heaviest animal and it should be placed on the second pillar.
The wolf comes next and it should be placed on the third pillar.
Finally, the penguin should be placed at the first pillar.


After placing the statues in the correct order, we will discover two secret compartments in the wall in front of us. In the compartment on the left, you will see two items, an “Old bone”, and a “Jar”. Tap on them to pick them up.

In the compartment on your right, you will see a ceramic pot. Tap on it and our character will shake it. After that, a bee will fly out of the pot.

The bee will go to the room on the left, so let’s follow it.

Well, it seems that the bee has settled on the flower. Tap on the bee again and it will fly into the dark passage in front of us. Tap on the passage to follow the bee.


The bee has again settled on the flower so let’s tap on it again. The bee will go to the next room on the left, so let’s go after it.


Again, the same thing. Tap on the bee and it will go to the next room on the left. Tap on the arrow on the left to follow the bee.


And, once more, tap on the bee and follow it into the next room on the left.


The bee will pollinate the tree, and it will instantly blossom. Tap on the red, yellow, and blue flowers to pick them up, and they will be added to your inventory. 
After that, the tree will wither away and, but it will be replaced by a mushroom. Tap on the “Mushroom” to pick it up.

With the tree out of the way, we can now approach the picture that was behind it. Tap on the picture to take a closer look.

The picture is made up of five pieces and our task is to assemble the picture by sliding the pieces into the correct position. But, there’s a catch. Looking from left to right,
If you tap on the second piece, the fifth piece will also slide up.
If you tap on the fourth piece, the third piece will also slide up.
Tapping on the first, third, and fifth pieces won’t cause additional pieces to slide up.
Ok, we will solve this puzzle in six steps. Let’s begin.
Step 1
Tap five times on the fourth piece (the goal is to place the serpent’s head on the top).


Step 2
Ok, now let’s set the fifth piece by tapping on the second piece (both will slide). Tap six times on the second piece. The goal is to connect the serpent’s head with its body (you will also connect the yellow item).

Step 3
We should now set the third piece. Tap once on the third piece. The goal is to reconnect the yellow item and also to reconnect the eagle-like humanoid that is standing upside down.

Step 4
We now have to set the second piece, but this will also move the fifth piece out of the alignment, so we will have to set it again in the next step. So, tap seven times on the second piece. Our goal is to assemble the man in the purple dress.

Step 5
Ok, now let’s put the fifth piece back into the correct position. Tap once on the fifth piece and you will connect the snake’s head with its body.

Step 6
Finally, let’s place the first piece into the correct position. Tap four times on the first piece. The goal is to assemble the man in a green tunic. Also, by doing this we will assemble the throne.

After we assemble the picture, the small compartment below it will open revealing a key that was hidden inside it. Tap on the key to pick it up and a “Black key” will be added to your inventory.

Ok, let’s go to the first room on the left.

Tap on the red lockbox to take a closer look at it, then select the “Black key” from the inventory and tap on the keyhole to unlock it.

You will see three items inside the box. Tap on all of them to pick them up and a “Wooden flute”, a “Pestle” and another “Jar” will be added to your inventory.

Ok, now let’s go to the second room on the left. We will use the flute to put the snake to sleep.

Tap on the snake to take a closer look at it.

Select the “Wooden flute” from the inventory and tap on the snake. Our character will play the lute and the music will put the snake to sleep.

Well, since the snake doesn’t represent a danger for our character anymore, let’s tap on the stone arm to pick it up. The “Hand of the statue” will be added to your inventory.

In the room with the large picture that we assembled, we also saw a stone eagle statue that was missing one hand, so let’s go there. Tap on the arrow on the left to go to this room.

Select the “Hand of the statue” from the inventory and tap on the statue on your right.

After we reattached the hand to the statue, something strange will happen. A beam of light will shoot out of both statues, and suddenly some symbols will appear on the huge picture on the wall. Let’s tap on the picture to take a closer look.

We can see that four symbols have appeared on the picture, and they are located on top of the four scepters. Let’s write down these symbols (from left to right) because we will need them in order to complete the next puzzle.
After that, tap on the arrow in the lower-left corner to go back.
NOTE: In your game, you might get different symbols, because this is one of the randomized puzzles, and there will be different symbols on the picture every time your start a new game.

Ok, let’s go back to the room with the sleeping snake. It’s the first one on the right.

Tap on the four symbols on your left to take a closer look.

The window is blocked by the roll-down shutter. In order to open it, we have to enter the combination of four symbols that we saw on the picture in the previous room. So, let’s do that.
NOTE: As I already said, you might get a different combination of symbols in your game, because this is one of the randomized puzzles.

As soon as you enter the correct combination of symbols, the shutter will roll up, revealing another “Jar” and a “Note with symbols”. Tap on both items to pick them up.

Before we take a look at the note, we should do something else, because our inventory space is full. Let’s go to the second room on the left.

Go straight, through the dark passage.

Tap on the ceramic bowl on the left to take a closer look at it.

We will use the “Pestle” to grind the flowers into the colored powder. First, select the “Blue flower” from the inventory, and then tap on the bowl to place it inside.

Select the “Pestle” from the inventory and tap on the flower to grind it into a blue powder.

Finally, select one of the “Jars” from the inventory and tap on the blue powder to put it inside the jar. A “Jar with blue dye” will be added to your inventory.

Now, select the “Red flower” from the inventory, and then tap on the bowl to place it inside.

Select the “Pestle” from the inventory and tap on the flower to grind it into a red powder.

Select another empty “Jar” from the inventory and tap on the red powder to put it inside the jar. A “Jar with red dye” will be added to your inventory.

Lastly, select the “Yellow flower” from the inventory, and then tap on the bowl to place it inside.

Select the “Pestle” from the inventory and tap on the flower to grind it into a yellow powder.

Select the last empty “Jar” from the inventory and tap on the yellow powder to put it inside the jar. A “Jar with yellow dye” will be added to your inventory.

Well, we should now take a look at the “Note with symbols” in our inventory. Tap on it.

On the note, we can see green, blue, red, and yellow circles and each circle has one symbol inside it.
Tap on the arrow in the lower-left corner of the screen after you take a look at the note.

On the wall in front of us, we can see four figures green, blue, red, and yellow, just like the circles on the note. The figures are pointing in different directions and we should memorize/write them down. So, let’s do that.
The blue figure is pointing up and to the right.
The red figure is pointing down and to the left.
The yellow figure is pointing to the left.
The green figure is pointing down and to the right.
After you memorize/ write down the direction in which the figures are pointing, tap on the dark hallway to go to the next room.

After that, proceed into the first room on the left.

Pay attention to the symbols on the wall, and then let’s take another look at the “Note with symbols”.

We can see that the symbols on the wall are the same as the ones on our note. So, let’s combine the symbols on the note with the direction in which the figures on the wall were pointing, because we will need this information in order to complete this puzzle.
First, we have Three Leaves inside the Green circle. The Green figure was pointing down and to the right.
Second, we have Three Dots inside the Blue circle. The Blue figure was pointing up and to the right.
Third, we have Three Triangles inside the Red circle. The Red figure was pointing down and to the left.
Fourth, we have Three Lines inside the Yellow circle. The Yellow figure was pointing to the left.
Write down this information, and then tap on the arrow in the lower-left corner to go back.
NOTE: The symbols in your game might be in circles of a different color. For example, three Leaves are in a green circle in my game, but they might be in a red circle in your game. However, you can still solve this puzzle by applying the method that we showed in this guide.

Ok, now let’s take a closer look at the hoops on the wall.

Let’s start with the symbol on the outer hoop. It’s three dots. On our note, three Dots were inside the Blue circle and the Blue figure was pointing up and to the right. So, tap on the symbol with the three Dots to slide it until it’s aligned with the arrow that is pointing up and to the right.


Three Leaves is the next symbol. On our note, three Leaves were inside the Green circle and the Green figure was pointing down and to the right. So, tap on the symbol with the three Leaves to slide it until it’s aligned with the arrow that is pointing down and to the right.


Three Triangles is the next symbol. On our note, three Triangles were inside the Red circle and the Red figure was pointing down and to the left. So, tap on the symbol with the three Triangles to slide it until it’s aligned with the arrow that is pointing down and to the left.


Finally, we have three Lines. On our note, three Lines were inside the Yellow circle and the Yellow figure was pointing to the left. So, tap on the symbol with the three Lines to slide it until it’s aligned with the arrow that is pointing to the left.


As soon as we placed the symbols in the correct position, the secret compartment will open and a stone disk will appear. Tap on it to pick it up and a “Stone with drawing of the Sun” will be added to your inventory, and the lever will appear.

Select the “Stone with drawing of the Sun” from the inventory and tap on the slot in the upper left corner to place it inside (below this slot are sun rays). We can see that there is another slot on the right and the stars are painted below it, so we will probably also need stone with the moon.

After we placed “Stone with drawing of the Sun” into the slot, the secret compartment below the picture opened, and we can see a key inside. Tap on it to pick it up and a “Golden key” will be added to your inventory.

Ok, now let’s pull the lever.

Pulling the lever will release the water in one of the nearby rooms. During the cutscene, we can see that the water is flowing from the mouths of three statues, a snake, a lion, and an eagle. Remembering these three animals will come in handy for one of the puzzles that will come up very soon.

Let’s go to the first room on the left.

Select “Golden key” from the inventory and tap on the chest to unlock it. The keypad will disappear, so tap on the chest to open it, and tap once more to take a look inside.

Tap on the “Hourglass” to pick it up. After that, tap on the arrow in the lower-left corner of the screen to go back.

Ok, now let’s go to the second room on the left.

On the left, we can see a large ceramic vase, and the yellow serpent is painted on it. Remember/write down the color of the serpent because we will need this information for the next puzzle (it is connected to the statues of snake, lion, and eagle head that we saw during the cutscene).
Once you’re done, tap on the dark passage to proceed to the next area.
NOTE: The serpent (and other animals) might have a different color in your game because this is one of the randomized puzzles. So, make sure to write down/memorize the color of the serpent (and the other two animals) in your game.

Let’s go into the first room on the right.

On the left, we can see a see large ceramic vase, and the red lion is painted on it. So, Lion = red.
Let’s proceed into the next room on the right.

On the right, we can see a see large ceramic vase, and the blue eagle is painted on it. So, Eagle = blue.
Let’s proceed into the next room on the right.

Ok, we reached the fountains that we saw in the cutscene. We already discovered the correct of each animal by looking at the paintings on ceramic vases. So, we have Yellow Serpent, Red Lion, and a Blue Eagle. We should now use the dyes from our inventory to change the color of the water below the stone statue. It should match the color of the painted animals that we saw on the vases. Let’s begin.
Select the “Jar with yellow dye” from the inventory and tap on the water below the serpent’s head.
NOTE: As I already mentioned, the animals on the vases may be colored differently in your game, because this puzzle is randomized.

Select the “Jar with red dye” from the inventory and tap on the water below the lion’s head.

Lastly, Select the “Jar with blue dye” from the inventory and tap on the water below the eagle’s head.

After we painted the water below the heads of the statues with the appropriate color, the secret compartment above them opened revealing another stone disk. Tap on it to pick it up, and a “Stone with drawing of the moon” will be added to your inventory.

Ok, let’s go back to the room with the empty slot for the “Stone with drawing of the moon”. To get there, go to the first room on the right, and then through the dark passage.


After that, go to the first room on the left.

Select the “Stone with drawing of the moon” from the inventory and place it into the empty slot on the right.

A secret compartment on the right side will open revealing some kind of crystal. Tap on it to pick it up and a “Crystal of quartz” will be added to your inventory.

Ok, we still didn’t go through the passage that is guarded by two stone eagle statues, so let’s check it out. To get there, go to the first room on the right, and then through the dark passage.


After that, go to the second room on the right.

Take a look at the two eagle warrior statues, because they are part of the next puzzle. After that, tap on the dark hallway to proceed into the next room.

Our character is shocked because in this room he saw Lian and Anna chained to the wall, while Frederick Nolsen is standing between them. Fortunately, it seems the villain is not aware of our presence because he’s in some kind of trance (probably part of the ritual). The dark magic is flowing from him into Anna and Lian. Detective Larsen realized that he has to quickly find a way to break the ritual and save them.
A huge symbol, similar to the one on the ring, is drawn on the floor in the center of the room. Select the “Piece of charcoal” from the inventory and tap on the symbol.


Our character concludes that the symbol on the floor looks exactly the same as the symbol on the ring. But then, he remembered that Laia’s words. She told him symbols should be drawn backward in order to stop the ritual. So, detective Ren took the piece of charcoal and drew the symbol backward (if you take a look at the previous screenshots you can see that symbol on the ground is now different, so our character did modify it and draw it backward)


There are also four small stone pillars in the room, and they are arranged around the circle. Every stone pillar has a drawing of one item, and we already have all four items in our inventory.
So, let’s place the items on the stone pillars. Select a “Crystal Quartz” an “Hourglass” a “Mushroom” and an “Old bone” (one by one), and place them on the pillars.

After we placed the items on the pillars, we could see a spark of light on the walls to our left and right, and suddenly, drawings of the two eagle warriors have appeared. These eagle warriors are similar to the statues that we saw at the entrance, but there are some differences. Let’s tap on the eagle warrior on our left to take a closer look.

While looking at this drawing we should try to memorize (or write down) several details.
First, the position of the head: the beak is on the right side
Second, the position of arms and hands:
The left arm is raised to shoulder height, and the elbow forms a 90-degree angle with the forearm. The hand is straight, in alignment with the forearm
The right arm is lowered to the hip, and again elbow forms a 90 degree angle with the forearm. The hand is straight, in alignment with the forearm
Finally, pay attention to the position of the symbol on the belt buckle.
After you memorize/write down this information, tap twice on the arrow in the lower-left corner to go back to the previous room (the one with two statues of eagle warriors)
NOTE: In your game, the drawings of eagle warriors might be different, because this is one of the randomized puzzles. For example, the arm could be straight instead of bent.


Ok, we can see that the statue in front of the door is different from the drawing on the wall. The head is turned to the right, just like on the painting, but we still have to adjust the position of the arms, hands, and belt buckle. Use your notes (or go back into the room to take another look) and rotate the parts of the statue until they match the drawing that we previously saw.

After that, we should go back to the ritual chamber to take a look at the drawing on the right.

Tap on the drawing on the right to take a closer look.

The eagle warrior on the right is a bit different from the one on the left, and we will have to pay attention to several more details.
First, we will look at the position of the head: it is turned to the left (our left)
Second, we will take a look at the beak: the beak is closed
Thirdly, we should take a look at the position of the wings: the left (our left) wing is lowered, while the right-wing is partially raised.
Fourthly, we should take note of the position of the symbol around the eagle warrior’s neck.
Finally, we should take a look at the length of the blade of the eagle warrior’s sword: medium length (the eagle warrior’s sword could be short, medium, or long)
After you memorize/write down this information, tap twice on the arrow in the lower-left corner to go back to the previous room (the one with two statues of eagle warriors)
NOTE: As I already said, the drawing on the right might be different in your game, because this is one of the randomized puzzles.


Just like with the previous statue, tap on the different parts to rotate them until they match the drawing that we just saw.
NOTE: As soon as you rotate the pieces of the statue to the correct position, you will enter into the finale of the game. Here, there can be two endings, a good one, and a bad one. We will show the bad ending first.

BAD ENDING
Completing the puzzle with the statues of eagle warriors will open Anna’s and Lian’s shackles. They will run toward our character, who wants to lead them out of this tomb as soon as possible. However, at this moment, Frederick Nolsen will suddenly “wake up” and he won’t let them leave, not now when he is so close to achieving eternal life.


If you don’t react, Frederick Nolsen will murder our character and his two friends, and will achieve the eternal life. After some time, we can see another article on the wall, added next to the article about Dan and Mia. Here we can see that three bodies have been found (detective Larsen, Lian, and Anna)…


GOOD ENDING
Before we enter the finale, let’s select the “Doll for rituals” from our inventory and tap on the “Strange ring” to combine these two items. A “Doll for rituals with ring” will be added to your inventory.

Tap on the door to enter the ritual chamber, and start the finale.

Well, just like before, we managed to free Lian and Anna, but Frederick woke up before they could leave. However, we will do this differently this time.

Quickly select the “Doll for rituals with ring” from the inventory and tap on the ritual circle to throw the doll. It will land just next to his feet.

Frederick is terrified, and he can’t believe that our character found a way to reverse the ritual. A few moments later, Frederick, a mass murderer, that has been terrorizing the people of Hidden Town for the last hundred years, will turn into some kind of dark energy… After that, his life force will be sucked into the doll, and his spirit trapped forever. The people of Hidden Town are finally safe… At least from this threat…


Detective Larsen is pleased, because he finally solved the case, after twenty years. He went to visit Dan’s and Mia’s grave and their spirits can finally rest. He also defeated Frederick, one of the greatest threats to the Hidden Town community.


In the next scene, we can see Dan and Mia looking through the window… But, since their murderer has been finally brought to justice, their spirits are finally free, and we can see them departing in the next scene.


But, detective Larsen doesn’t know what to do with the doll. After all, everyone at the police station would laugh at him if he decides to say that Frederick Nolsen, a man that died a hundred years, is trapped inside the doll. So, locking it away in the police station is not an option.

Luckily, Laura, the storekeeper that told us how to reverse the ritual, offered to safe keep the doll. She says that she knows a thing or two about rituals and dark magic, so our character decided to trust her and gave her the doll. After all, without her advice he wouldn’t be able to survive the encounter with Frederick, so he has no reason not to trust her.


Detective Larsen thanked her for everything that she did and entrusted her with the safekeeping of the doll. She seems like the best choice for this job.


In the next scene, we can see Laura going to the back of her shop, probably with the intention to place the doll into the safe.

Tap on the grid on the red box to start the interaction.

Here, we can see two eyes, one on each side of the grid. Inside every field of the grid is a line. The goal is to rotate the fields and use the lines to connect the eye on the left with the eye on the right. Let’s begin.
Step 1
Tap three times on the grid next to the eye on the left.
After that tap once on the first field in the third row.

Step 2
Tap once on the second field in the third row.
After that tap once on the third field in the third row.

Step 3
Tap three times on the third field in the fourth row.
After that, tap three times on the fourth field in the fourth row.

The fourth field in the third row is already connected to our line, so there is no need to rotate it.
Finally, tap once on the fourth field in the second row, and you will connect the eye on the left to the eye on the right.

In the next scene, we can see Laia arranging the lines. After that, she opened the box, and place Frederick’s doll inside. However, we can see three more dolls inside this box, Meridia’s, Delian’s, and Laia’s… Oh, in the third game “Nowhere House” we were trapped inside the witch’s house, and there we met Delian and Meridia. Both of them were trapped by the witch, and their spirits locked inside the portraits. Also, after she trapped them, the witch could shapeshift into one of them. So, it looks like Laia has become another victim of the evil witch. I don’t remember Laia from the previous games. The name of our character in the third game “Nowhere house” was Adria. Fortunately, it looks like Adria did manage to escape from the witch’s house because there are only four dolls inside the red box.
Quick reminder. At the end of the third game, Adria decided to go back inside the witch’s house, because she wanted to try to save Meridia and Delian (even though they told her that she can’t help them). The game ended with the witch closing the door while Adria was still inside. As I already said, it looks like Adria managed to escape. However, it seems that now witch keeps the souls of her victims trapped inside the Shamalu dolls instead of the portraits.

Well, it turns out we were right, because in the last scene the witch dropped her disguise, and shapeshifted from Laia back to her original form. This means that detective Ren just gave the doll that contains the soul of the most dangerous murderer to the witch, and that’s probably the worst choice for safekeeping of this dangerous creature. Well, I guess the witch could bring back Frederick Nolsen as her minion, and that might be the main event of one of the sequels. Also, one of the next games could also be centered around Laia, her story, and her encounter with the witch, because we didn’t meet this character yet (as far as I know).

Well, that brings us to the end of this adventure. If you’re interested in Escape Room games, check out our guides for the other games of this genre.
Thank you for reading.
Part I Part II