Chapter 11 Case 64-73
Complete Walkthrough
Hello everyone and welcome to the walkthrough for the eleventh chapter “Horror Amusement Park” of the Case Hunter, puzzle game. On this page, you can find the solution for cases 64-73.
Chapter 11: Horror Amusement Park
While our character and the clown were escaping from the prison in a hot air balloon, the clown pushed our character overboard. The detective managed to grab onto the rope, but the clown cut it. Fortunately, our character fell in the water and survived the fall. That’s how this chapter of the story begins.


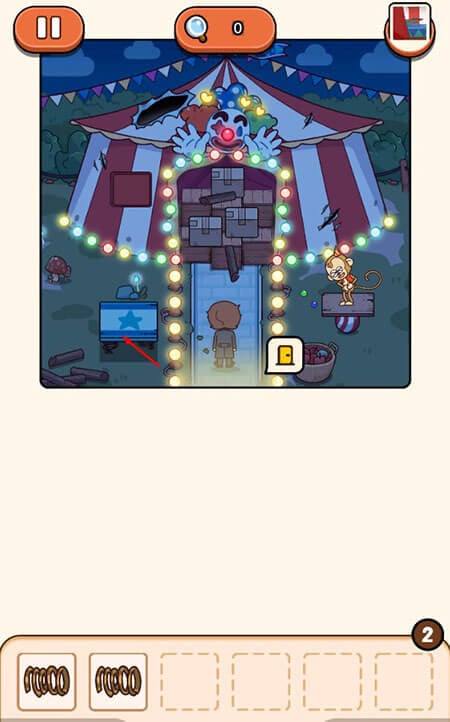
CASE 64 “Lion King”
In this case, our task is to find a lion king.

Tap on the crane vending machine to take a closer look at it.

The claw is moving left and right, and we should tap on the red button when the crane is directly above the hamster.

Ok, we managed to grab the hamster and pull it out of the machine. Now, tap on the hamster to pick it up.

Tap on the wheel to take a closer look at it. Also, we can see that the electricity in the circus is at a very low level.

Drag the hamster from the inventory and put it inside the wheel.

The hamsters are now turning the wheel and with that, we restored power to the circus. Let’s go into the tent and see what’s inside.

Tap on the ball to take a closer look at it.

Tap on the ball again to pick it up.

Tap on the seal to start the interaction.

Drag the ball from the inventory and give it to the seal. As soon as you do this, the seal will start to juggle the ball. We should count how many times the seal will juggle the ball before making a break because this will uncover the three-digit numerical code that we will need for the next puzzle.
NOTE: After some time, the hamsters will stop running and the power in the circus will go down. If this happens, go back outside and tap on the hamsters to wake them up.

After observing the seal, we can see that it juggled the ball thrice, then made a short pause and juggled the ball twice. After that, it made another short pause and juggled the ball four times. So, our code is “324”. Memorize it, and then tap on the red box on your right to start the interaction.

Tap on the keypad to bring it up and enter the code “324”.

Inside the box, you will find a key and a hose. Tap on both items to pick them up.

Ok, let’s go back outside.

Tap on the water hydrant to take a closer look at it.

Drag the hose from the inventory and attach it to the water hydrant.

Drag the hose and put it through the window.

Finally, tap on the valve on the water hydrant to turn on the water.

Ok, let’s go back inside.

Tap on the fire ring to take a closer look at it.

Tap on the hose to extinguish the fire.

Tap on the hole to go to the next area.

Tap on the truck to take a closer look at it.

Drag the key from the inventory and use it to unlock the door.

Tap on the red button to turn on the light.

Tap on the light on the wall to take a closer look.

Ok, we should now assemble the “light” by placing the pieces in the correct position inside the circle.
Step 1
Drag the largest piece and put it into the bottom right corner.

Step 2
Drag the second largest piece and place it to the left of the first one.

Step 3
The third-largest piece should be placed above the first one.

Step 4
Finally, take the smaller two pieces and place them into the remaining slots.

Ok, now tap on the truck to take a look at it, once more.

The glove box is now open, so tap on the pliers to pick them up.

After that, tap on the cat to take a closer look at it.

Drag the pliers from the inventory, and use them to cut the collar.

The cat will walk into the light, and its shadow looks like a lion. With that, we solved our sixty-fourth case.

CASE 65 “Escape from the Tiger”
In this case, our task is to retrieve the huge lizard that escaped from its cage.

First, tap on the circus worker to start the interaction.

Ok, let’s find that lizard. Tap on the bird to take a closer look at it.

Tap on the bird again to pull out one of its feathers.

Tap on the feather to pick it up.

Ok, let’s go outside.

Tap on the monkey to take a closer look at it.

Drag the feather from the inventory and use it to tickle the monkey.

The monkey will start to laugh, and it will drop the balls. Tap on the red ball to pick it up.

We can see that there’s something shiny behind the boxes. Let’s take a closer look.

Tap on the spring to pick it up.

Ok, let’s go back inside.

Tap on the cabinet on your left to take a closer look at it.

Drag the red ball from the inventory and place it where the clown’s nose should be.

The secret compartment will open automatically, so tap on the spring to pick it up.

Ok, let’s go back outside, and assemble the springboard, since now we have both springs.

Tap on the springboard to take a closer look at it.
Drag both springs from the inventory and place them into the slots, below the springboard.

Well, we repaired the springboard, so let’s try it out. Tap on the springboard, and our character will jump to a new area.

Well, there’s definitely something hidden behind the sheet. Let’s take a closer look.

Tap on the sheet to move it aside.

Oh, wow, that’s not a lizard, but a freaking dinosaur. If we tap on it, we will find out that our character will need some kind of a weapon in order to capture this beast.

Ok, let’s take a closer look at the cannon, located in the bottom left corner of the screen.

Tap on the cannon.

Well, instead of using the cannon against the dinosaur, our character launched himself back into the first room. And heart some parts of his body in the process… Well, that’s one way to travel. Tap on the picture of the dinosaur to start the interaction.

Tap on the terrified circus worker, and he will throw you a sling.

Well, I don’t think that the sling would be the best choice of weapon against the dinosaur, but we don’t have any other options, so tap on the sling to pick it up.

Ok, let’s go back to the dinosaur and try to shoot it down with the sling. First, tap on the door to go outside.

Tap on the springboard to take a closer look at it, then tap again to use it.

Equip the sling by dragging it toward the box (in the bottom screen).

Tap on the sling to attack the dinosaur. You will have to hit it three times in order to bring it down (you can see the dinosaur’s HP pool above its head)

Well, somehow we managed to knock out the dinosaur with the sling, and with that, we solved our sixty-fifth case.

CASE 66 “Following the Clown”
In this case, we should follow the clown and find out his plans.

First, tap on the desk in the bottom right corner to take a closer look at it.

Here, you will find a blue ball and a sword. Tap on both items to pick them up. There’s also some kind of a laser pistol here, but we will come back to it later.

Tap on the shield and swords to take a closer look.

Tap on both swords to pick them up.

Tap on the machine on your left to take a closer look at it.

Drag the blue ball from the inventory and drop it into the third pipe (looking from left to right).

The ball will travel through the pipes and when it reaches the end of the line, the machine will award you with two swords. Tap on them to pick them up.

Tap on the barrel (with the head of the doll sticking from it) to take a closer look.

Drag four swords from the inventory and insert them into the four slots on the barrel (there are six slots in total, but two swords are already inserted into the slots).

As soon as you insert the last sword into the slot, the doll head will pop out from the barrel. Drag the last sword from your inventory, and use it to cut the doll’s head.

Well, it seems that we discovered a green item. Tap on it to pick it up.

Ok, we found a battery. Let’s tap on the desk, once more, and take a closer look at the laser pistol.

Drag the battery from your inventory and place it into the slot on the laser pistol.

Tap on the laser pistol to pick it up.

Tap on the door on your left to take a closer look.

We can see that the clown is driving the van. Drag the lase pistol from the inventory and use it to knock out the clown.

As soon as we knocked out the clown, the door opened. Tap on the door to go to the next area.

Tap on the stairs on your right to take a closer look.

Tap on number 1.

Tap on number 4.

After that, tap on number 6.

And finally, tap on number 7.

We reached the door with the keypad. Tap on it to take a closer look.

We tapped on numbers “1467” before we reached the door, so let’s enter this combination.

Well, it looks like this was the correct combination and the door opened. Let’s go inside.

Tapping on the door will bring up the switch. Tap on the switch to turn on the power for the balloons.

Ok, the door on the left is now open, so let’s tap on it to go to the next area.

We entered the elevator and it will take us to the top floor. From there, we can see a bunch of balloons, but there are numbers on the three of them. Looking at the numbers from left to right we have “181”. Memorize this number.

Tap on the door to go back outside.

Tap on the purple door to take a closer look.

Tap on the keypad to bring it up. After that, enter the code “181” (that we found by looking at the balloons from the elevator).


With that, we completed our sixty-sixth case.

CASE 67 “Missing Cuckoo”
In this case, our task is to choose the correct dialog option and solve the case.

Tap on “Cuckoo?”

Tap on the second option “Did something happen?”

Tap on the first option “Is he trying to catch some birds?”

Tap on the second option “Anything is possible.”

Tap on “We should be optimistic.”

Tap on “we must believe in Cuckoo.”

Tap on the first option “Then they probably didn’t get Cuckoo.”

Tap on the first option “Do you have any snacks that Cuckoo likes.”

Tap on “Scatter some feed on the ground. Cuckoo might appear.”

So, we managed to find Cuckoo, and with that, we solved our sixty-seventh case.

CASE 68 “Escape to Safety”
In this case, our character has to escape from the clown’s lair before his captor returns.

Well, our character is tied to a chair, and there is some kind of a numerical lock next to his right hand, so let’s tap on it and take a closer look.

Ok, the goal here is to insert the correct time. We can see an image of a very big clock on the floor, but the image is turned upside down (we can confirm this by looking at the letter “A”). By looking at the clock from the correct perspective, we can determine that it shows 12:25. So, let’s insert the value “1225”.

Well, we managed to untie our character, so let’s take a look around the room. Tap on the large red machine, on your left.

Here, we can see two buttons. First, tap on the “rocket button” and the rocket will emerge from the underground hangar. After that, tap on the “hatch button” ad this will open the hatch that leads to the other room.


Tap on the open hatch to go to the other room.

Tap on the duct tape on your right to take a closer look at it, then tap again to pick it up.

Ok, let’s go back to the previous room.

Tap on the door with the bloodstain on it.

Drag the duct tape from the inventory and use it to take the fingerprint from the bloodstain.

Tap on the other door, on your left.

First, tap on the button on your right. It’s clear that we will need a fingerprint to open the door, so let’s use duct tape.

Ok, the elevator will automatically take our character into the next room. Tap on the rock on your right to take a closer look at it.

Tap on the rock, repeatedly, several times, to push it through the hole.

Ok, now tap on the valve to take a closer look at it.

Tap on the valve again, and fluid will begin to leak from the pipe.

We’re done here. Let’s go back to the previous room.

Tap on the hatch to proceed into the next room.

Ok, we can see that the area is now flooded, and the rock that we pushed through the hole is right next to the rocket. Tap on the rocket, and our character will climb on it.

Finally, tap on the rocket to get in.

Press the “rocket button” on your right to launch the rocket and escape from this dungeon.

Well, we managed to escape from the lair of the mad clown and, with that, we solved our sixty-eight case.

CASE 69 “A Strange Tent”
In this case, our task is to find three keys that the circus master lost.

Tap on the door to go to the next area.

Again, tap on the far end of the street to go to the next area.

Tap on the water drain to take a closer look at it.

Tap on the fuse to pick it up.

Tap on the image of a clown and the key will fall out. Tap on the key to pick it up.


Ok, let’s go back to the previous area.

Tap on the circuit board to take a closer look at it, and tap again to open the lid.


First, tap on the malfunctioning fuse to remove it.

After that, drag the fuse from the inventory and place it into the empty slot.

Finally, tap on the switch to turn on the power.

Ok, let’s go back to the first room.

Tap on the huge green board to take a closer look at it.

We can rotate the elements on the board by tapping on them, and this way we can activate the power in two objects in the circus, the pony carousel, and the lamp post. However, only one of them can be active at one time. Also, the blue arrow in the lower right corner represents the entry point for the electricity, while the blue lines represent the flow of electricity. We will solve this puzzle in several steps. Let’s begin.
Step 1
Tap once on the “L” shaped symbol on the left.

Step 2
Tap once on the “T” shaped symbol in the middle.
Note: The “L” shape in the lower right corner is missing, so we will first turn on the power for the pony carousel.

Step 3
Tap three times on the “L” shaped symbol located to the left of the pony carousel.

Step 4
Tap three times on the “L” shaped on the right.

Step 5
Tap three times on the “L” shaped symbol located to the right of the pony carousel.

Ok, we turned on the power for the pony carousel, so let’s go outside and check it out.

Tap on the pony carousel to take a closer look at it.

Here we can see another key and the missing symbol. Tap on both items to pick them up.

Well, since we found the missing symbol, we should go back to the previous room and turn on the power for the lamp post. Tap on the door to go back.

Again, tap on the green board to start the interaction.

Drag the “L” shaped symbol from the inventory and place it into the empty slot.

Ok, now we should rotate the symbols and bring the power to the lamp post. We will solve this puzzle in several steps, just like the previous one.
Step 1
Tap twice on the “T” shaped symbol in the middle.

Step 2
Tap three times on the “L” shaped symbol on the right.

Step 3
Tap three times on the “L” shaped symbol in the lower right corner of the screen.

Ok, let’s check out that lamppost. Tap on the door to exit.

Tap on the far end of the street to proceed to the next area.

Tap on the lamppost to take a closer look at it.

Tap on the box to take a closer look at it, then tap again to open it.

Here, we should drag the cables and connect them by matching colors.

After we connected the cables, the light bulb was turned on and the key drop out of the lamppost. Tap on the key to pick it up.

Well, since we have all the keys, let’s tap on the door with three keyholes.

Drag the keys from the inventory and insert them into the keyholes.

We managed to enter the circus after unlocking the main door and, with that, we solved our sixty-ninth case.

CASE 70 “Shadow”
In this case, our task is to investigate the ghost from the tent.

Tap on the door on your right to go to the next area.

Tap on the ghost next to the box to take a closer look at it.

Tap on the blue box to open it.

The toy clown will jump out of the box, and he is holding some kind of a yellow item in his right hand. Tap on this item to pick it up.

Ok, let’s go back to the previous room, and see what we can do with the yellow button.

Tap on the pink door to take a closer look at it.

We can see that the button on our right is missing. So, let’s drag the yellow button from the inventory and place it into the empty slot.

Tap on the yellow button to activate the machine.

Well, it looks like we found the VIP card. Tap on it to pick it up.

Ok, let’s go back to the room with the toy clown.

Tap on the door on your left to take a closer look at it.

Drag the VIP card from the inventory and use it to open the door.

After that, tap on the door again to proceed into the VIP room.

Tap on the piggy bank on your right to take a closer look at it.

Tap on the piggy bank, and our character will find the coin. Tap on the coin to pick it up.


Ok, let’s go back to the first room.


Tap on the machine to take a closer look at it.

Drag the coin from the inventory and put it inside the slot.

The mechanical hand will take out the doll. Tap on the doll to pick it up.

Well, we should now go back to the VP room.


Tap on the green chair to take a closer look at it.

Drag the doll from the inventory and put it on the chair.

The ghost will drag away the chair and we now have access to the other part of the room. Tap on the shovel to take a closer look at it.

Tap on the shovel to pick it up.

Ok, let’s go back to the previous room.

We can the ghost but it will quickly disappear, and now we can see something buried in the ground. Tap on it.

Drag the shovel from the inventory and use it to dig it up.

Well, it looks like we found the remains of the ghost. Tap on the remains to pick them up.

Well, we found the remains, and with that, we solved our seventieth case.

CASE 71 “Dangerous Illusions”
In this case, our task is to choose the correct dialog option and solve the case.

Tap on the “What is it?”

Tap on the second option “There are many kind angles in this world.”

Tap on “I can see them in my dreams, but not in the real world.”

Tap on “What did you do today?”

Tap on the first option “What did you eat during the picnic?”

Tap on the second option “Was it something you ate during the picnic?”

Tap on “What did you do when you get home?”

Tap on the first option “This mushroom is poisonous! You are suffering from mushroom poisoning!”

Tap on “I will take you to the hospital.”

Well, our character managed to save the Resident, and with that, we solved our seventy-first case.

CASE 72 “Creepy Circus”
In this case, our task is to find and capture the ghost.

First, tap on the desk to take a closer look at it.

Tap on the key to pick it up.

We should now try to use the key. Tap on the cabinet in the upper right corner of the room to take a closer look at it.

Drag the key from the inventory and use it to unlock the cabinet.

Oh, no! The key broke in half. Well, I guess we will have to find another way to unlock the cabinet. Tap on the cannon in the lower-left corner of the room to take a closer look at it.

Tap on the cannon twice and it will launch you into the next area.


Tap on the mirror to take a closer look at it.

Tap on the bobby pin to pick it up. Well, now we should be able to lockpick the cabinet.

Tap again on the cannon in the upper right corner of the room, and our character will walk over to it.

Just like before, tap twice on the cannon and it will launch you into the previous room.

Tap on the cabinet to approach it.

Drag the bobby pin from the inventory and use it to unlock the cabinet.

Tap on the foil to pick it up.

Ok, we should now go back to the previous room, so tap on the cannon once to approach it and then tap twice more to go to the other area.

Tap on the closet on your left to take a closer look at it.

Well, it looks like our character can become invisible by using this closet. Interesting. However, the closet is locked by a five-letter password, so we will have to find it in order to unlock the cabinet. Tap on the small window to take a closer look.

Tap on the window again. The ghost and the upside-down letters will appear.

Ok, now let’s take another look at the mirror.

Well, it seems that the password that we have been looking for is “JOKER”. So, let’s go back to the closet.

Tap on the password to take a closer look. After that, enter the password “JOKER”


Well, we opened the closer, let’s see if it works. Tap on it.

As soon as we tapped on the closet our character became invisible. Let’s proceed. Tap on the cannon in the lower-left corner of the room to approach it, and tap twice more to go to the next area.

Tap on the cage to take a closer look at it.

Wait for the ghost to enter the cage, then quickly drag the foil from your inventory and use it to trap the ghost.

We managed to trap the ghost and with that, we completed the seventy-second case.

CASE 73 “Final Battle”
In this case, our character will have the final showdown with his archenemy, the Clown. However, we found an ally along the way. The ghost (while he was human) was murdered by the Clown, and he now seeks vengeance.

Tap on the puzzle located on the rock to take a closer look.

Here, we have to get to the pipe, by moving the pieces. We will do this puzzle in several steps.
Step 1
Drag the large horizontal piece down, and then drag down the pipe.


Step 2
Move the two smaller cubes all the way to the right. After that, move up the large vertical piece.


Step 3
Move up the other two small cubes (the ones on the left). After that, move the large horizontal piece all the way to the left.


Step 4
Drag the pipe down, and then move the small cube on your right below the other small cube.


Step 5
Move the large vertical piece to the right. After that, we should move the lower cube on the left, up and to the right.


Step 6
Finally, move up the large horizontal piece, and you will clear the way for the pipe.


Let’s take a closer look at the waterfall.

Drag the pipe from your inventory and give it to ghost.

The ghost will drain the waterfall by drinking all the water, and we can now proceed into the next area.

As soon as you enter the cave, you should run to the right. First, the boulder will come rolling towards you, and after it the log. Wait until the danger has passed.


Luckily, we managed to avoid this trap. Tap on the red item on the ground to take a closer look.

It looks like some kind of tiny dagger. Tap on it to pick it up.

Tap on the door to proceed to the next area.

Wait until you have a clear path, and then make a run to the next door.

Well, it seems that we will have two overcome two obstacles in order to get to the Clown. The first is the minefield, and the second one is fire. We will deal with the minefield first. Tap on it to take a closer look.

We can determine the position of the mines on the grid, by looking at mines on the upper screen. So, tap on the fields marked on the image below to safely go through the minefield.

Finally, tap on the last (fourth) field in the first row to solve this puzzle.


Ok, now let’s take a closer look at the fire.

Drag the small dagger from the inventory and use it to poke several holes in our ghost ally. The water will rush out of the ghost (he did drink tons of water at the waterfall) extinguishing the fire.

Ok, it’s time for the final showdown. Tap on the Clown to start the interaction.

Well, it seems that the Clown won’t go down without a fight.

Nope. He chose to flee rather than fight. The Clown jumped off the ledge and escaped, so we will probably face him again in the future. On the bright side, we just solved or seventy-third case.
